Peltor SportTac upgrades for two-way radios

The (3M) Peltor SportTac is a common low cost hunting/general purpose medium protection (~26 dB) ear protector headset with hear-through amplifiers.
The intended use for this particular model is hunting, where the attenuation is likely adequate for occasionally firing a rifle, and protection against nearby rifle fire.
For general use it's a decent quality headset, it provides suitable attenuation for use with angle grinders, compressed air, and general high background noise environments such as near trucks.
Modifying personal protective equipment will void the warranty, and for professional use will likely also void your workers compensation insurance or similar. If you need 2-way radio communications for a professional use case, buy a pre-made solution.
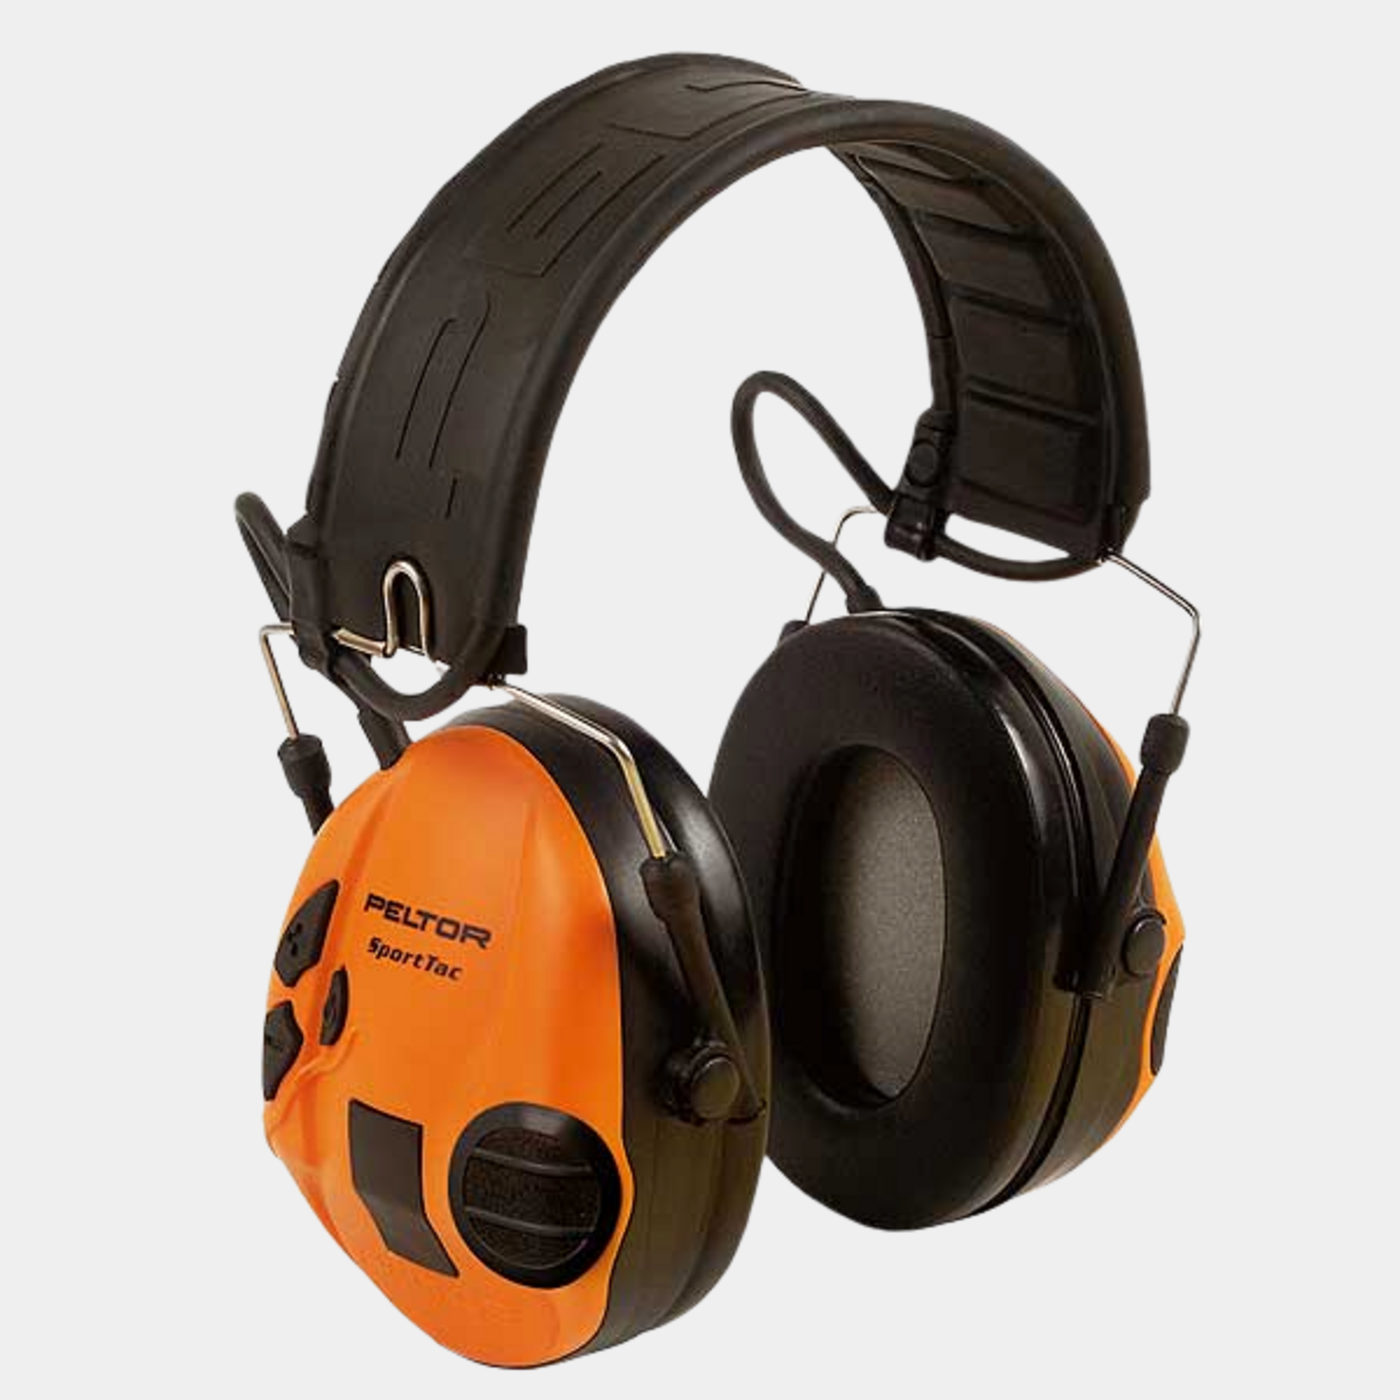
The SportTac runs off two AAA batteries, and has a simple user interface consisting of 3 buttons for on/off, and hear-through volume up/down. The hear-through feature is quite useful for general use since it means you can generally wear them continuously without losing situational awareness, and you can hear nearby voices clearly.
While sometimes marketed as "Surround", it uses stereo front mounted microphones. Some kind of custom ASIC (probably a custom MCU or even analog IC) implements a volume limiter that cuts the sound when loud noises occur.
Battery life is excellent, especially with Lithium AAAs.
The headset can be connected to sound sources through a standard 2-pin connector commonly used for military headsets and microphones. This connector appears to be designed U-173/U (male), which mates with a U-172/U (female cable mount) et al.
This input is amplified through the same circuitry as the hear-through microphones and routed to both ears.
Improved Radio Audio
Depending on your radio, you may have great success simply connecting the earpiece audio output to the amplified input.
I had an issue with my DP4600e where the output noise floor of the radio is relatively high, while the sensitivity of the headset is also very high. As such the output noise floor was very audible through the headset, and to get a comfortable listening volume I had to turn the volume all the way down.
This combo meant the signal to noise ratio was terrible.
To get around this issue you could add a resistor attenuator to the external input in the headset, or do what I did and add a dedicated radio speaker into the left earpiece.
This modification is not terribly difficult, the external input plug is wired to a small PCB that also has the battery contacts. Cutting these wires and drilling two small holes into the headset was fairly trivial.
Finding a good speaker to put in there was more difficult however. I initially tried a 2 W 8 Ω laptop style speaker but found that the audio level was very low, and it quickly distorted. I suspect the impedance was too low for a typical radio headset output.
The speaker has to be quite thin in order to not push the foam insert into your ear when wearing the headset, and it has to include a protective grill on the front to avoid the foam insert crushing the membrane.
I ended up using a 32 Ω speaker I extracted from a Z-Tactical H-250 handset (a clone of a common military handset). This is a ~20 mm round speaker with a metal grill on the front. It fit reasonably well in the front bottom part of the headset, and provided decent quality sound with a comfortable volume. I don't have a part number for this speaker, but I have noticed similar looking 32 Ω speakers available on eBay and AliExpress.
Old phone handsets may be a good source of speakers in general.
Note that you can pull off both the side panel and the ear-muff piece of the headset, so access is quite good.
I mounted the speaker using 3M VHB foam tape and some strategic foam around it to avoid it rattling against the surrounding plastic.
Improved Comfort
The standard earmuffs use foam padding, this is fine for short term use but for long terms use (several hours) there is a better option. 3M sells silicone gel pads for all if not the vast majority of their headsets, the SportTac kit has part number HY80-EU.
The cost of the official 3M kit is around half that of the actual headset at the time of writing, but the improved comfort is definitely worth it.
Adding a boom-microphone
The standard SportTac does not official come with a microphone option, though some Bluetooth and radio equipped models do.
The thing about these Peltor headsets is that they have huge parts commonality, and the only thing preventing you from sticking a microphone on a SportTac is that there's nowhere to mount it.
The microphone mounts to the black plastic pieces that also hold the earpieces to the head strap (or helmet mount for some models).
The part number for a microphone holder is A44-F/1, this same piece appear to be used for the significantly more expensive ComTac III model.
You're now free to buy a boom microphone suitable for Comtac II/III headsets, the official one appears to be the MT33/1 waterproof noise reducing dynamic microphone. These microphones are standard for military equipment, and are typically 150 Ω with a sensitivity of around –66 dBV⁄Pa [@ 1 kHz]. They're not cheap.
The noise reduction part of these microphones is effected by having an acoustic port on the back of the microphone, and using a large microphone element. This gives the microphone a high sensitivity when it's on-axis and close, and attenuates sound entering from other angles. The use of a foam surround further reduces wind noise.
There are other options from 3M with the same mount, though many versions are designed for Bluetooth/integrated radio headsets and there is no easily available microphone spec for these models.
Your mileage may vary with using these microphones for typical radios; the sensitivity of a typical electret microphone in a hand-microphone is specified to –40 dBV⁄Pa, significantly higher than dynamic military microphones. However, dynamic noise reducing boom microphones are typically extreme close talk designs, intended to be no more than 2 cm from your lips. (3M/Peltor specifies 3-5 mm for these microphones)
As such the acoustic level is much higher than a typical hand-held microphone, which may compensate for the lower sensitivity. If your radio has adjustable gain you'll likely need to turn it up, if you have AGC it should work out.
The final pieces you need to hook up a radio properly is:
- Wiring harness
- PTT
The wiring harness is a set of wires with U-172/3 connectors that connect to the headset speaker and microphone, and adapts it to a standard U94 connector. The U94 connector is a military/aerospace standard headset plug that looks like a short ¼" jack, it's a 4 pin connector.
The PTT adapter is a little box with a big PTT button, a U94 female connector that goes to the headset, and a cable end that plugs in to your radio of choice.
The PTT may also include e.g. a microphone amplifier/matching transformer to ensure the radio microphone input has the appropriate level.
Amplified adapters are available for some radio types including the Motorola XPR series, though the price is significantly higher than a basic one. These PTTs are large enough that you could fit a single transistor FET preamp into one relatively easily, provided you can get access to the radios power output. See my post about the Ascom SE-140 for an example of a basic 150 Ω microphone preamp using a 2N7002.
As always, eBay is a great place to save money by spending a ton of it. TAC-SKY is a company with an official AliExpress store as well as one or more eBay stores, and they sell all the parts needed including the microphone, a wiring harness, and PTTs.
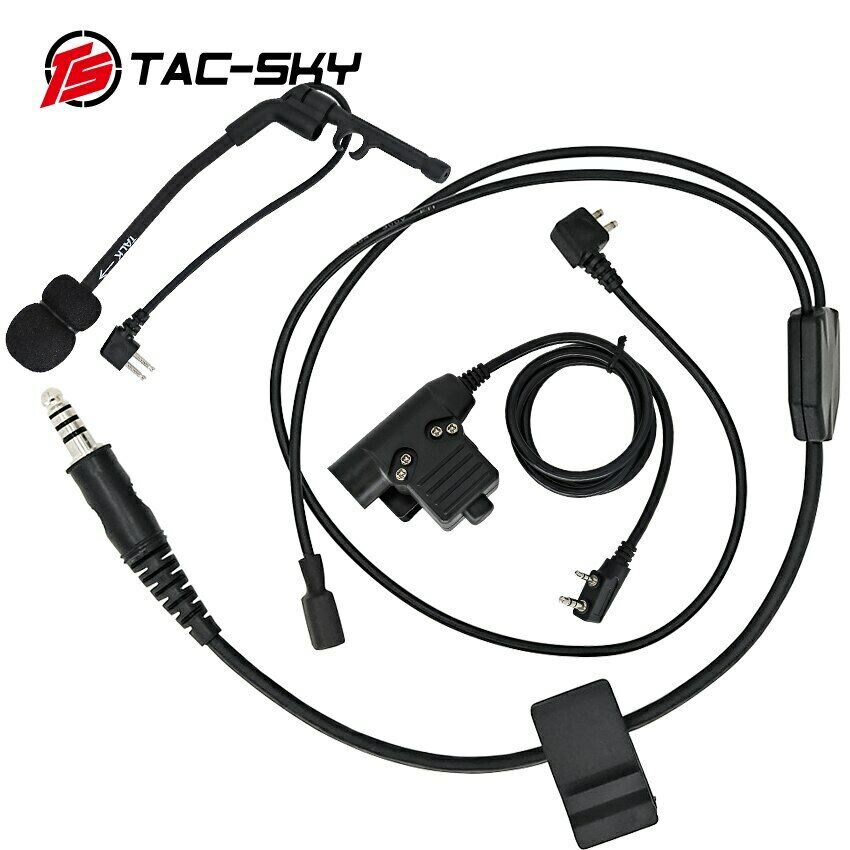
The kit above contains everything needed for a Kenwood compatible radio interface (i.e. most radios manufactured by Chinese companies including Baofeng, Wouxun, Tyt).
The microphone used is an electret type with a suitable sensitivity for most modern two way radios. Note that these microphones are polarized, but the plug isn't. As such you need to test it every time you plug it in to make sure it's connected the right way around. Sound quality appeared to perfectly acceptable, so I would suggest most users buy these first before spending big bucks on 3M microphones.
I also purchased a Motorola XPR series compatible PTT made by Z-Tactical separately. One note on low cost Motorola XPR accessories: the screw used to attach the accessory is a UNC #4-40 insert in the radio, but several accessories incorrectly use M3 threaded screws.
Buying a ComTac clone?
You can also find ComTac clones relatively easily, the most prominent type being made by Z-Tactical. This appears to be functionally identical including spare parts compatibility.
While I can't speak for the current production models, I did buy a Z-Tactical headset in ~2015 and found that while the functionality of e.g. the hear-through and microphone setup was quite good, the actual hearing protection part was significantly worse than the SportTac despite nominally being equivalent.